TWRP (Custom recovery ) can be extremely useful, not just for rooting your K20 Plus but in many other ways. First of all, with TWRP you can create a nandroid backup. It’s a complete system backup which will restore your phone to the exact same state as before. As after rooting your phone is more susceptible to bricking if messed with, a nandroid backup can be a savior. Thanks to messi2050@xda for making TWRP for K20 Plus.
TWRP can also be used to Flash custom ROMs such as lineage OS. A custom ROM is much more customizable than a stock ROM. Various K20 Plus Mods and Hacks are achievable with the help of TWRP.
So Let’s proceed to K20 Plus TWRP installation –
Make sure that you’ve unlocked the LG K20 Plus Bootloader before moving ahead –
How to Install TWRP on LG K20 Plus
Below are the files needed for this process with their respective download links. Download the files to your computer before moving further.
1. no-verity-opt-encrypt-6.0.zip
2. TWRP image file i.e recovery.img (Extract the rar file to get recovery.img)
3.Minimal ADB and Fastboot exe setup file
Step 1 – Copying no-verity-opt-encrypt-6.0.zip to the SD Card

We’ve to transfer the downloaded no-verity-opt-encrypt.zip file to the SD card.
Do not copy it to the internal memory. During TWRP installation we’ve to format internal storage which would erase the copied file.
Copy the downloaded zip file as shown above.

Connect your K20 Plus to the computer in file transfer mode

Now click on LG K20 Plus Portable Media Player, and open SD card folder as shown above.

Paste the copied file here.
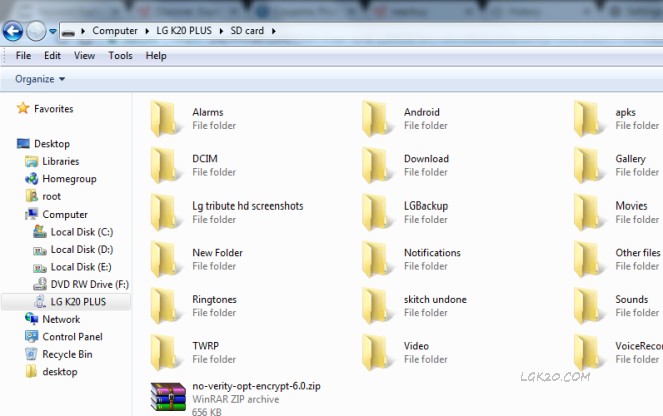
We’ve successfully copied no-verity-opt-encrypt.zip file to the SD card.
Step 2 – Copying TWRP, recovery.img file to Minimal ADB and Fastboot folder.

Now we’ve to install Minimal ADB and Fastboot as shown above. Thanks to shimp208@xda for making this small and easy to use program. If not downloaded yet, get it from below link –
Next step is to copy the TWRP image file to Minimal ADB and Fastboot folder. You can download the file from below link if not done yet –
Extract the downloaded rar file. It contains recovery.img file, which we’ve to transfer to Minimal ADB and Fastboot folder in C Drive as shown below.

Copy the extracted recovery.img file as shown above.

Open Local Disk (C:) Drive on your computer (or the drive in which you’ve installed Minimal ADB and Fastboot)

Look for “Program Files” and open it.

Now open “Minimal ADB and Fastboot” folder.
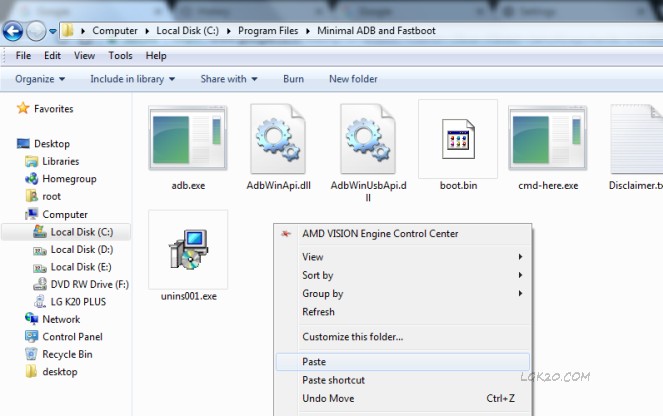
We’ve to paste the copied file into this folder. Right-click and Paste as shown above.

Select “Continue” to give permission as administrator to copy this file.

recovery.img is copied to Minimal ADB and Fastboot folder. Now we’re ready to flash the copied recovery.img file.
Step 3 – Writing custom recovery (TWRP) in Fastboot Mode

Run Minimal ADB and Fastboot program on your computer.

Type adb devices in the command prompt window and hit Enter.

Our connected phone, LGMP260 is detected in adb mode.
Move on to Next Page (Page 2) –
hi my friend:
I have a problem with my LG K20 plus phone, when i try to flash the TWRP it is ok, i did flash it rigth but when i try to get into the TWRP the phone do the factory reset, i mean it do not enter to the TWRP, do you know what i am doing wrong??
amigo ami me pasaba lo mismo pero desconectas el cable quitas la bateria vuelve a ponerla y dehi sigue el normal las instrucciones
when i try to flash the custom recovery i get the “waiting for any device” message. from what ive been able to find online this is due to a driver issue. do you have a recommended source and instructions for installing the correct driver?
Have you developed a method to flash TWRP without an SD Card?
se encripto me pide reiniciar
Hello. I get Failed (remote: cannot flash this partition in unlocked state) when i try to fastboot flash recovery.img. Please help? I have been trying for hours. Thank you
If you are having problems getting to the TWRP Recovery screen after flashing recovery.img successfully.
At the part when you hold down the volume down button and press power twice to get to the Factory Reset menu and it pops up for Factory Reset.
When you select Yes to Factory Reset. Immediately after hitting Yes the second time for confirmation. Hold down the Volumn Down and Power button one more time to get to the TWRP Recovery screen. Otherwise it will actualyl do a Factory Reset and you will see an Cirlce Moon looking thing that says Erasing underneath it and it was a pain in the ass to discover this was why i
how did u do it
After rooting, I tried to upload lineage rom, and now whenever I try rebooting system it is stuck on lg screen, I remove the battery and try again. Fail. I even tried the whole adb fastboot flash recovery recovery.img, successful continue steps, in twrp, wipe type yes back back reboot recovery, stuck on lg screen again…..anyone know how I can bring the phone back to life?
you need to download the rom it is very probable that the system has been damaged
Ru’s comment actually worked! thank you!!
i have the same problem as RU except i cant get past the factory reset,