Radiant Max 5G EA211001 is a budget 5G Android smartphone from AT&T. It’s the successor to Radiant Max 4G U705AA which was launched in 2020.
The 5G model offers a bigger screen, a better camera, more internal memory, and Android 11 out of the box.
In this post, we are going to learn how to bypass the Google account verification on AT&T Radiant Max 5G without a computer –

The Google account verification is required, when you hard reset the Radiant Max device via Recovery Mode.
I forgot the Radiant Max 5G password. To bypass the lock screen I did a factory reset with the volume up & power button.
After the reset, I landed on the “START” screen.
Click “START” to begin the setup.
Then connect your device to a Wifi network.

In a few minutes, it’ll bring you to the “Copy apps & data” screen. Click “Don’t copy” to move ahead.

Now, I’m stuck on the screen lock password verification screen. It’s asking to verify with the password or with the previously synced Google account.
I do not remember these details.
Let’s use the latest 2022 hack to bypass the Google lock on Radiant Max 5G Android 11 as follows –
How to bypass Google account verification – FRP lock on AT&T Radiant MAX 5G EA211001 without computer Android 11 2022
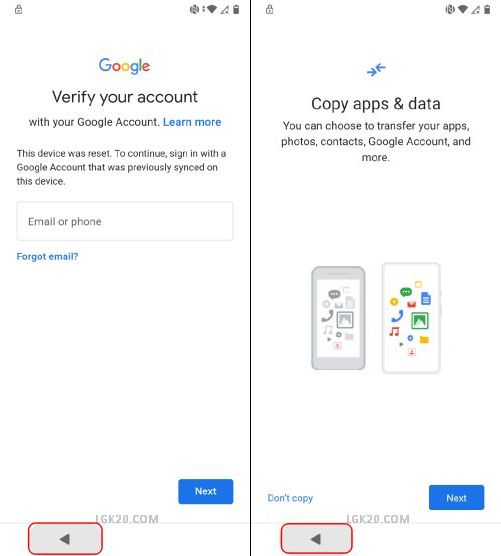
Tap the back button multiple times to go back to the “START” screen.

Now, touch the “Emergency Call” button.
On the phone dialer, there is “EMERGENCY INFORMATION” on the top. Click it 2 times.
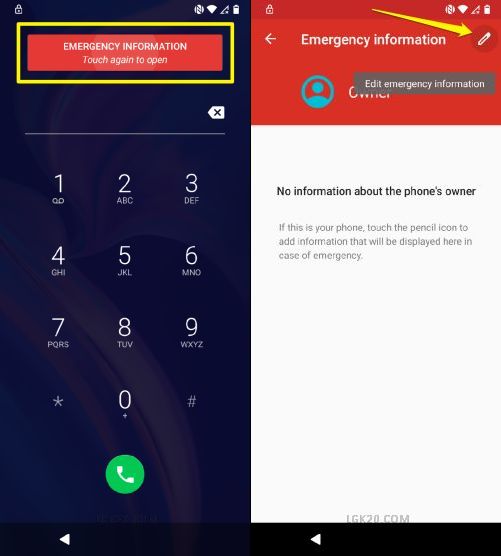
On the following screen, you’ll see a “pencil edit icon” on the top. Click on it.
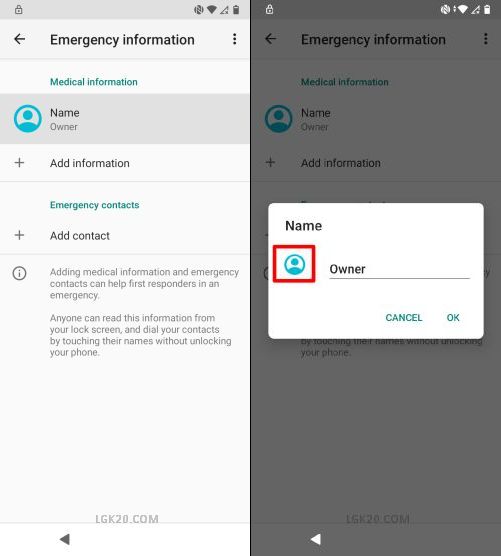
Now, select “Name – Owner” and then tap the “Profile icon” as shown above.

A dropdown appears with 2 options. Select the lower option – “Choose an image”.
Now, you must be on the “Recent” screen.
Here tap the “3 bar icon” on the top.

Now, long-press on “Photos” or “Drive” to reach the “App Info” screen.
Choose the 2nd option – “Permissions”.

This time we are on the “App Permissions” screen. There is a search button on top.
Write settings in the search bar & wait for the search result to show up.
Then scroll down to the bottom of the page. There you’ll find “Settings – App Info”. Click on it.

Hit “OPEN” to enter the Settings app & scroll down to the bottom.

Now, click on “Accessibility” > “Accessibility Menu”.

Turn on the accessibility menu shortcut.
Now, hit “ALLOW” to use this shortcut.

The shortcut button is created. It shows up at the bottom-right corner.
We are going to use it later.
Now, tap the back button 2 times to reach the Settings page.

Now, open “Apps & notifications” and then select “App Info”.

We need to disable 2 apps.
First, open the “Android Setup” app & hit the “FORCE STOP” button.

Now, go one step back and launch Google Play Services.
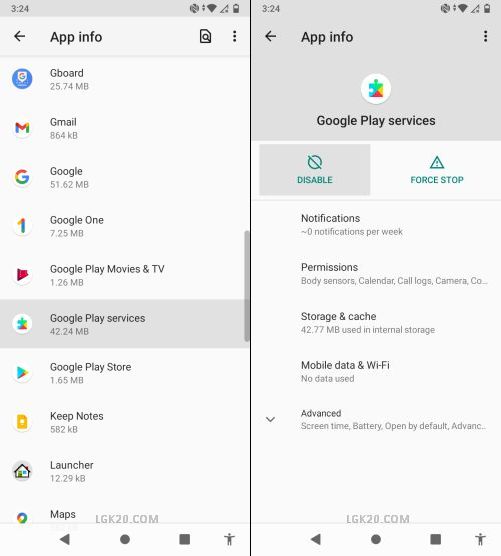
On the “Google Play Services – App Info” screen, hit the “DISABLE” button.

We are all done. Now, we need to go all the way back to the first page.
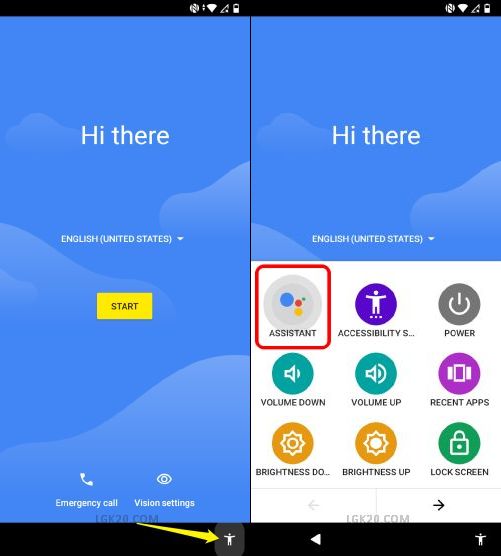
We have reached the “START” screen.
You’ll notice the accessibility menu shortcut button at the bottom-left corner. Click on it.
When the menu opens, touch “ASSISTANT”.

Google Assistant didn’t open. It reads – “Google Play Services required”. Hit “Settings” to move ahead.
Now, click “ENABLE” to turn on Google Play Services.

After turning on the app, go back to the “START” screen.

Hit the “START” button to proceed.

When you land on the “Copy apps & data” page, you’ve to tap the back button once.
This will bring you to the “Connect to Wifi” screen.
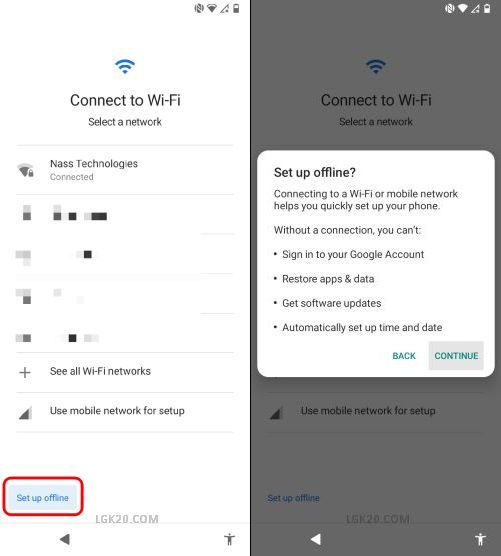
On this page, there is a new option – “Set up offline”.
Select “Set up offline” and then hit “CONTINUE”.

We have bypassed the Google verification on Radiant Max 5G.
Now, accept the Google Services terms and conditions.
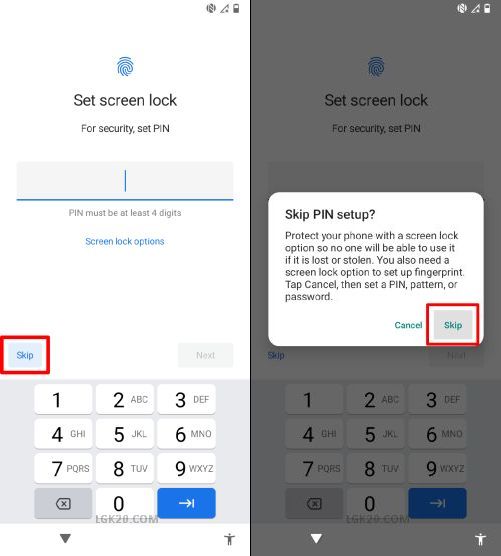
Then skip the screen lock setup.

Follow the on-screen prompts and keep moving ahead. Hit “Finish” to complete the setup wizard.

We have successfully landed on the AT&T Radiant Max 5G home screen thus bypassing the Google account.
Now, you can turn off the accessibility menu shortcut.
Launch the Settings app.

Select “Accessibility” > “Accessibility Menu” & turn off the shortcut.
If you’re stuck at any stage, feel free to leave a comment below.