In this post, we are going to use the latest 2023 method to bypass the Google account verification on all the Motorola Android 12 devices such as Moto G 5G, Moto G Stylus 5G, Moto G Play 2023, Moto G Pure, Motorola Edge, Moto Razr, etc.
So, let’s begin the troubleshooting –
I was stuck on the lock screen on my Motorola Android 12 device.
So, I did a factory reset using the volume down & power button.
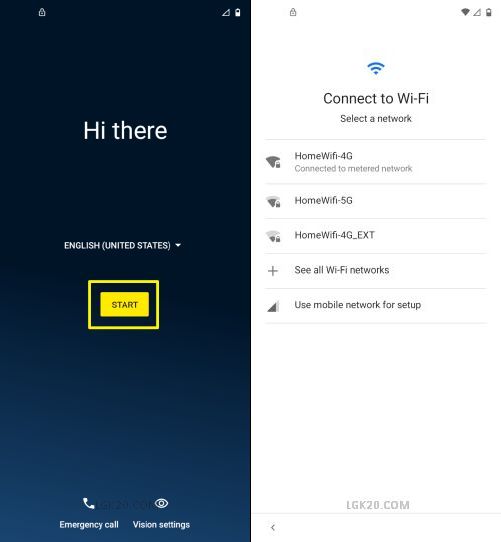
Now, the reset is done. We are on the “Hi There” screen of the setup wizard.
Let’s begin the setup.
In the next step, connect your device to the internet.

Click “Don’t copy” when you reach the “Copy apps & data” screen.

Now, we are on the screen lock verification page.
I do not remember the lock screen password or the previously synced Google account.
I’ll use the latest 2023 hack to bypass the Google FRP lock as follows –
How to bypass Google account verification/FRP lock on all Motorola Android 12 devices without a PC 2023

To bypass the verification move back to the first page.

Now, click on “Vision Settings” > “Talkback”.

Enable Talkback and draw an opposite L. Swipe right then up.
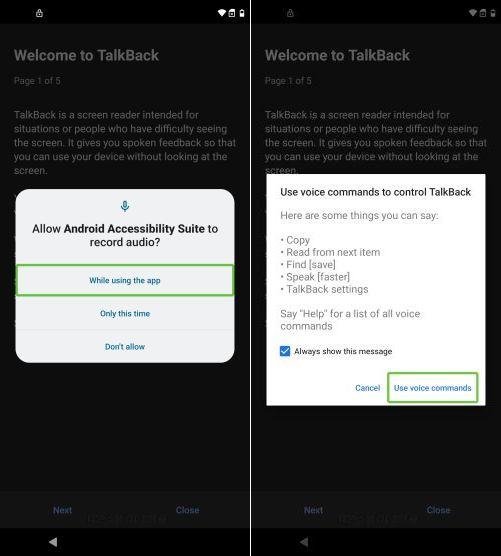
When the request appears, double-click on “While using this app”.
Now, a voice commands window appears. Double tap “Use voice commands”.
Then say ASSISTANT to launch this app.

When the Google assistant app launches, double-click the “3 bar icon” at the bottom.
This will take you to the “Tips for you” page.
Now, we can disable Talkback using the volume keys.
Press and hold both volume keys for 3 seconds to enable the Talkback shortcut.

Again press and hold the volume buttons for 3 secs to turn off Talkback.

By hitting the “3 bar icon” we reached the “Tips for you” screen as shown above.
Now, click on “Explore more from Assistant” the last option on the page.

On the “Explore” screen, hit the “profile picture icon” at the top and select “Help” as shown above.

Hit the search box and type delete.
Choose the search result – “Delete, disable & manage unused apps on Android”.

On the next page, you’ll see the link – “Tap to go to application settings”. Click on it.
Now, we are on the “All Apps” screen.
Scroll down and choose “Settings”.

Then hit “OPEN” to launch the Settings app.

In Settings, go to “Apps” > “All Apps”.

Now, open “Android Setup” and hit the “FORCE STOP” button.

Go one step back.

Now, open Google Play Services and click the “DISABLE” button.

Now, go 2 steps back to the Settings page.

Move 2 steps back.

This time open “Accessibility” > “Accessibility Menu”.

Turn on the Accessiblity Menu Shortcut.

The shortcut button is created.
Now, move all the way back to the first page.

We are again on the “START” screen.
Hit the accessibility menu shortcut and then choose “Assistant”.

It says – Google Play Services Required.
Hit “Settings” to proceed.
Now, click the “ENABLE” option to turn on the app.

After enabling Google Play Services, again go back to the first page.

Click “START” to proceed.

When you reach the “Privacy & software updates” or “Copy apps & data” screen, tap the back button once.
This will take you to the “Connect to Wifi” page.

Use the “Skip” button on the Wifi screen.
Click on “Skip” then “Continue”.

We have bypassed the Google account.
Hit the “Accept” button on the Google Services screen.

Now, skip the screen lock setup.

Follow the on-screen prompts and keep moving ahead.
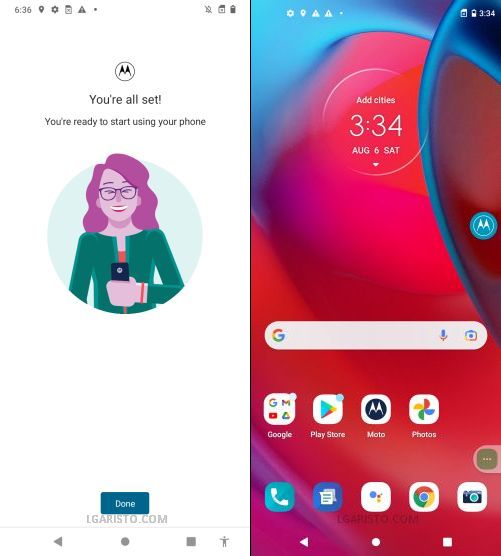
Finally hit done to complete the setup wizard.
We have successfully landed on the Motorola Android 12 home screen thus bypassing the Google account verification.
For any queries or feedback, leave a comment below.
Hello there
My moto g puré update recently and ever since android 12 was installed I start having problems with my device.
When i make a phone call with earbuds people can’t hear me ,but i can hear then and i know it’s not the earbuds because are brand-new is something with the android software.
Any suggestions to get fix my device.
Thanks.
Mine says voice con Commands not available during set up.. what do I do now.
Which phone do you have? Please share the model number